Feeds:
Posts
Comments

Archive for the ‘Free Patterns’ Category

I made three squares for Lesa‘s daughter Nesa, who has been put on the liver transplant list.  Nesa requested red, black and white Mickey Mouse colors.  All three of the squares have bullion/roll stitches.  Bullion stitches are crocheted by yarning over multiple times and drawing a loop through all of them.  The trick is getting all the loops evenly wrapped around the center,   

Katie’s Bliss square pattern uses the bent bullion stitch, which consists of a bullion followed by a slip stitch.  Once I finished the flower center, the rest of the pattern went quickly.  I like the center white rounds, which are supposed to look like hearts.  (Mine are a little square-ish.)

This square is called Angels Around the World, with four angels standing on the center circle.  Bonnie Pierce did a wonderful job writing the pattern clearly and concisely, but I really had to pay attention to get every part crocheted correctly!  

I’m glad that I have made a few Daisy Flower Crochet Chairty Squares, because the construction was similar.  The angel skirts and bodies are crocheted as joint rows with the background and then the angel wings and heads are added with separate lengths of yarn.   There are about ten ends to tuck in for one six inch square!


The Lacy Bullion Heart square was the easiest square out of the bunch.  The center of my heart has a spiraled look, which doesn’t show in the sample picture.  Next time I will chain-one more loosely; that might fix the swirl look. 

I added the ‘2008’ after sewing the heart to the black square.  Even though I pinned and basted the heart on the background, it wasn’t centered very well, so I added the date to balance the square out.

I had to eliminate one or more rows from each of the squares to get exactly six inches across.  Even with a size E crochet hook, I could never get the correct gauge.  Red Heart Super Saver runs a little thicker than other worsted weight yarn and I’m guessing that was part of the sizing issue.   

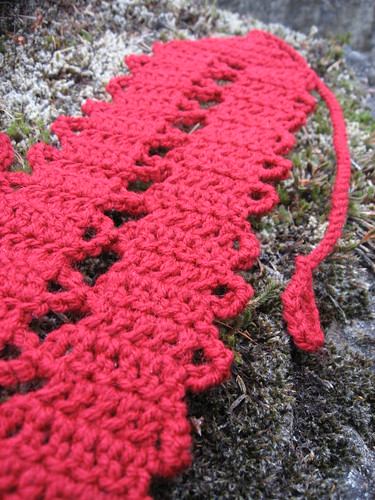
Also, I had a few problems photographing these squares.  Black and red colors are really difficult to capture in their true tones.  This was true for the Lacy Bullion Square especially.  To get the colors to photograph better I waited until late in the day and lowered the exposure level.  (On my Canon PowerShot A530, I used program mode and pressed the +/- button to adjust the exposure manually.)

Read Full Post »

Mellissa of The Adventures of Wondermommy asked me to test her new Ice Cream Cone pattern about a month ago.  Since I didn’t have a photo to work from, I was surprised to find that the cone is shaped like a waffle cone! 

The overall pattern is really simple to piece together and you only need to know how to increase in the round and crochet shells.  Both the cone and the ice cream start with the smallest number of single crochet stitches and increase to their widest part.  Then the pieces are sewn together and the shell border is added.  The whole thing works up relatively fast, especially since you can hide the ends with the stuffing! 

My Ice Cream Cone measures 3.5″ x 7″.  I used some stash worsted weight wool that was a bit thinner than Red Heart Super Saver and a size E crochet hook.  I’d like to try this pattern again in a lighter weight yarn.  Also, I’m interested to see what the cone would look like with the wrong side showing. 

Visit the pattern page to see Mellissa’s sherbert version, which is so cute!

Thank you for asking me to test the pattern, Mellissa!  (And thanks for the pattern books and crochet hook!)

Read Full Post »

I finally finished the Celestine Crochet (a knit version is also available).  The pattern was a bit interesting to follow.  Each point is made from the bottom up.  With the first cone made, the second base is made by chaining a portion and then slip stitiching the rest on the adjacent points.  After the first few points, the general idea is easy to pick up. 

The yarn is a beautiful mixture of a brilliant blue and golden browns, hand dyed by Kayla of The Yarn Bearer.  The 100% wool content and fingering weight made it difficult for me to keep yarn tight.  The fibers felt more ‘sticky’ to me and even with a size C hook, I have little holes where the stuffing shows through. 

The hardest part of the Crochet Celestine was the stuffing.  This was my first project with stuffing since I was a kid.  I found out very quickly that just taking big clumps of polyfil and shoving them in the points made a really bumpy texture. 

The second time around I fluffed the stuffing by pulling and stretching it.  Much better!  Also, I found that the whole shape looked more symmetrical when the center part was stuffed well.  If I ever make this pattern again I would stuff it with a wiffle ball in the center to save on stuffing and make the whole thing lighter.  

Question is, what do I do with it?

Read Full Post »

The Lacey the not so Lacey Headband turned out to be a much wider headband than I thought.  I used Red Heart in Ranch Red and a size H hook and my headband measures about 4″ wide.  

I’ve been hiking around Moran State Park a lot lately and this headband with a low ponytail is perfect.  I like having my hair out of my face when I’m on a long walk.  I haven’t taken my camera with me on the trails yet, but I really need to.  Late spring and early summer is so beautiful in the park!

Apart from a hiking headband, the reason I wanted to make the Lacey Headband was to sample the bruges lace technique.  From what I understand, you crochet a long strip with chain loops hanging off the side.  When you make the second strip the parallel chain loops are slip stitched together.  This makes an interlocking, lacy fabric.  The center strip looks like the X-stitch to me. 


The pattern is a really nice introduction to bruges lace. The written directions are very clear and there’s a chart included.  I’m not a full fledged chart reader, but if you’re a visual person, it can really make the process clearer. 

I’ll leave you with an evening photograph.  The hummingbirds around the house stop by the feeders all day, but at sunset they come out in swarms!

You can see a slide show of the other hummingbird pictures I took on Slide.com. 

*That’s cool* a random fact

Hummingbirds have the fastest wing beats and the largest brains proportionate to body weight, of any other bird.

Read Full Post »

I made a Seamless Nintendo DS Lite Sock as a belated Mother’s Day gift for my mom.  She started out playing Tetris on the original Nintendo Gameboy my brother and I bought as kids and now owns a few versions of the newer Gameboys.     

I modeled the cozy after Spock’s uniform since my mom is also a Star Trek fan.  The yarn is Red Heart Super Saver in Country Blue and the felt Starfleet insignia was copied from an illustration of the Starfleet insignias from Danhausertrek.com.   The site is dedicated to the the Animated Series, so I’m not sure if it is completely accurate to Star Trek: The Original Series. 

I couldn’t find gold felt at the craft store, but they did have this bright yellow.  I’m not sure how well the craft felt will hold up to heavy use; it felt a little flimsy.  There’s another layer of felt under the insignia to plump it up and hopefully reinforce the applique. 


The DS Lite Sock pattern is double knit, which means you cast on a certain number of stitches on straight needles and knit the front and back at the same time.  I was confused with the directions to start since it doesn’t actually spell this fact out to you.  Once I understood the idea of double knitting, the whole project turned out to be very easy.  You only need to know knit, purl and the slip stitch to work this cozy. 

The gauge is pretty tight with worsted weight yarn and small needles.  The pattern estimates needing size 6 needles but I ended up using size 2s.  Possibly I’m a loose knitter?  Also, I had to restart a couple times because the smaller needles were harder for me to use.  With the right gauge, the sock fits really nicely and there are no seams to sew. 

*That’s cool* a random fact

The Vulcan Nerve Pinch was invented by Leonard Nimoy as a way for Spock to overpower opponents without having to resort to violence.

Read Full Post »

Ashley got my purse-themed Swap Swap Gals package, so I can share what I made her! 

The biggest item was a book bag size Waves of Color Tote Bag.  I added one-half more chains to the foundation and cut the gusset width by three rows.  And, obviously, there are added rows to the body.  I love this pattern and I would like to make the original size also.

I actually ran out of the cream and you can see the upper portion is whiter with ’emergency’ filler yarn.  For the handle I used an alernating spike stitch, which I hope will help keep the strap from stretching. 

The flower pin is the SkaMama Mum.  The pattern is pretty easy, consisting of chain-loops and sc rounds.  I sewed the flower to a saftey pin so Ashley could remove it if she wanted or use elsewhere. 

The In Bloom pattern from Stitch ‘n Bitch: the Happy Hooker is a perfect beginner purse.  You only need to know chains and half double crochet.  To get the gauge, I had to use a size E hook with worsted weight yarn.  I think I need to invest in some handled hooks for my size C through E crochet hooks.  The slim handle with heavier yarn hurts my hands. 

Anyway, I had the pink and brown yarn left over from my last swap package to Katrina.  In order to get the stripes to mirror each other the dark brown bottom is three rows instead of two. 

 The bow is a random little novelty I had in my craft supplies.  Like the SkaMama Mum, I used a safety pin to attach it to the purse. 

This purse got a zipper and a lining.  I don’t mind linings anymore, but zippers still drive me crazy.  They are not very forgiving! 

I saw this Shell Coin Purse first on This Blonde Knits (& Crochets!).  (Check out Mary’s project page if you’re on Ravelry.)  While the brown yarn doesn’t exactly do the pattern justice, it’s what I had on hand. 


I added an embroidered daisy flower on the back corner.  It was a little interesting to trying to find the right distance for each petal on a crocheted background.   


Also, I lined the coin purse with some light-weight polka dot fabric.  I ended up really liking this pattern because it’s easy to memorize and the shells make it hard to miss a stitch.  Plus, the coin purse is perfectly funtional without the zipper and lining. 


The pattern for the Rectangle Bobble purse can be found in the book One Skein: 30 Quick Projects to Knit or Crochet.  I actually made the purse part a long time ago, but never got around to lining it.  Nothing like a swap deadline to get things done!


The lining fabric is a heavy satin with a dusting of glitter.  Hopefully the glitter doesn’t wipe of onto every little thing, but I can’t promise anything. 


This little purse is called the Travel Jewelery Pouch.  It’s basically made of two overlapping double crochet octagons and a few chain rounds for the border.

To sew the octagons together I used a size H hook to slip stitch along the chain spaces. 

The seaming creates little pockets.  The whole pattern is built around a clever, but simple, design.  I would make this again, but in the recommended sport-weight.  The Lion Brand Babysoft I had on hand was a bit bulky for the pattern. 

The leaf motif tie ends were made of a round of single crochets, followed by slip stitches, single crochet and a picot.  (I love picots!)

Finally, I sent Ashley some yarn, a knitting book and a size 6 circular knitting needle (not pictured).  The yarn looks a little rough around the edges because I crammed them all into a tiny package, then took the skeins out for the picture. 

I found the book Kids Knitting, at a local donation-run store.  There’s a page that is loose and the sleeve is missing, but the it’s in good condition overall.  The book is geared towards teaching kids to knit, but the ‘learning to knit’ section is pretty thorough.  I figure it will come in handy when her little kids (fingers crossed) want to learn to knit, too. 

I also sent Ashley a set of plastic size 6 circular needles.  My grandma started me on plastic needles because the knitting is easier to keep on the needles.  I personally still like plastic needles for that reason and because they are light.  I suppose that’s why some knitters like wood or bamboo needles, but I’ve never tried them before. 

So that’s everything.  I had so much fun making all these purses, but I think I’ll steer clear of anything that needs a lining for a while!


Read Full Post »


I won yarn from Kayla!  That’s 1200 yards of hand-dyed, 100% fingering weight yarn.  I’ve actually never worked with fingering weight yarn before, so I’m very excited.

Kayla hosted the contest on her blog, The Yarn Bearer.  All she required was a comment with what you would make from this skein.  I chose the Celestine Crochet, which looks like a spiky ball.  If I like the pattern enough I’ll try the knitted version, too.


I plan to start crocheting just as soon as I wind this hank into a ball.  I’m a bit scared about tangles from Angela‘s experience, but I think I’ll take her advice and hang the yarn off the end of a chair. 

Thanks again, Kayla, for the beautiful yarn!


Read Full Post »

I made the Grannyesque Headband with random tan wool I had from my stash.  The yarn was bought by my grandmother, so I’m guessing it’s Mill End yarn.  There’s no label to go by, anyway. 

The headband pattern is so easy, with granny shells and triangular ends.  My favorite part were the ties, which are written into the border.  I love patterns that start and end with the same length of yarn!

Here’s a picture from the garden.  I like how the light bends around the petals.  I wonder if there’s a ‘rule’ in photography not to have a strong line end in a corner.  The stem angle looks off to me, now that I look at it.   

Happy Wednesday!

*That’s cool* a random fact

According to the Thai solar calendar, the color associated with Wednesday is green.

Read Full Post »

I crocheted this Kitchen Scrubbie with the very last strands of my Sugar ‘n Cream stash.  I ran out of Hot Blue after making the body so, I had to dig around in my small scraps basket for a very short strand of Summer Splash cotton yarn.  Fortunately, the variegated matched the blue body and the green color makes it looks like a flower stem.

The pattern calls for a size J hook but I went with a size I hook since my size J hook is MIA at the moment. (Angela, I loose them too!) The scrubbie itself consists of two layers chain loops and a slip stitch handle.  The double layer construction may confuse beginning crocheters, but the idea is easy enough.  

Here you can see the ‘inside’ of the scrubbie.

This kitchen scrubbie could double as a bath poof since the stitches aren’t too tight.  It would probably dry just fine.  If a reinforced handle were added it would also make a nice duster. 


This was a nice distraction from my top secret Swap Swap Gals purses.  I’ll get to that in a later post!

*That’s cool* a random fact

Scientists in Japan claim they have developed the first true blue roses by extracting the gene for blue pigment (delphinidin) from pansies.

Read Full Post »

I met with my brother for some shopping and we got to try bubble tea.  Apparently Bubble Tea Cafe is a new store in the mall set up after the cookie place went out of business.  There were lots of different flavors to choose from, including honeydew, taro and blueberry, but we settled on grape and mango-peach flavor, respectively. 

We both thought it was delicious and I personally liked the tapioca peals: they taste sweet and chewy and you suck them up through a huge half-inch wide straw.  These drinks are expensive at $4.25 (only one size available), but it’s a nice treat and those tapioca pearls are really filling!

I crocheted the Beer Bracelets while waiting/riding the San Juan ferry in the morning, about a two hour stretch.   They’re a little too small for the bubble tea containers, but I imagine they would fit just fine on a beer bottle or paper coffee cup. 

I was thinking I’d get an action photograph somewhere along in the day with some coffee cups, but the bubble tea models were an unexpected surprise.  Add the flower pot from the entrance of the mall and some odd stares from fellow shoppers and poof, crochet FO pictures! 

I went a little crazy sewing on the buttons.  I’m pretty sure you’re supposed to sew just two parallel lines.  It just speaks to my sewing skills I guess.  Speaking of yarn, I used TLC Essentials in Jungle and a random ball of yarn rescued from the local thrift store.  If anyone could identify this purple and pink variegated yarn I would be very happy!

The Beer Bracelets use the linked treble stitch, which creates tall, connected stitches.  If you’ve seen my adjacent double crochet stitch tutorial, you know I’m a fan of patching up unwanted crochet holes.  The picture above shoes the horizontal bars which you loop around, like in tunisian crochet.   Every linked TR row is followed by a row of single crochet and the whole cozy is bordered in slip stitches. 

Here you can see the wrong size of the cozy with the linked TR stitches separated by single crochet stitches. 

And for good measure, this is what the car deck of the ferry looked like just before docking back on Orcas Island.  You can see a slide show of all the ferry pictures I took that day on Slide.com.

Read Full Post »

Older Posts »